Inga's Indulgence


Showing posts with label Desserts. Show all posts

Monday, April 2, 2012

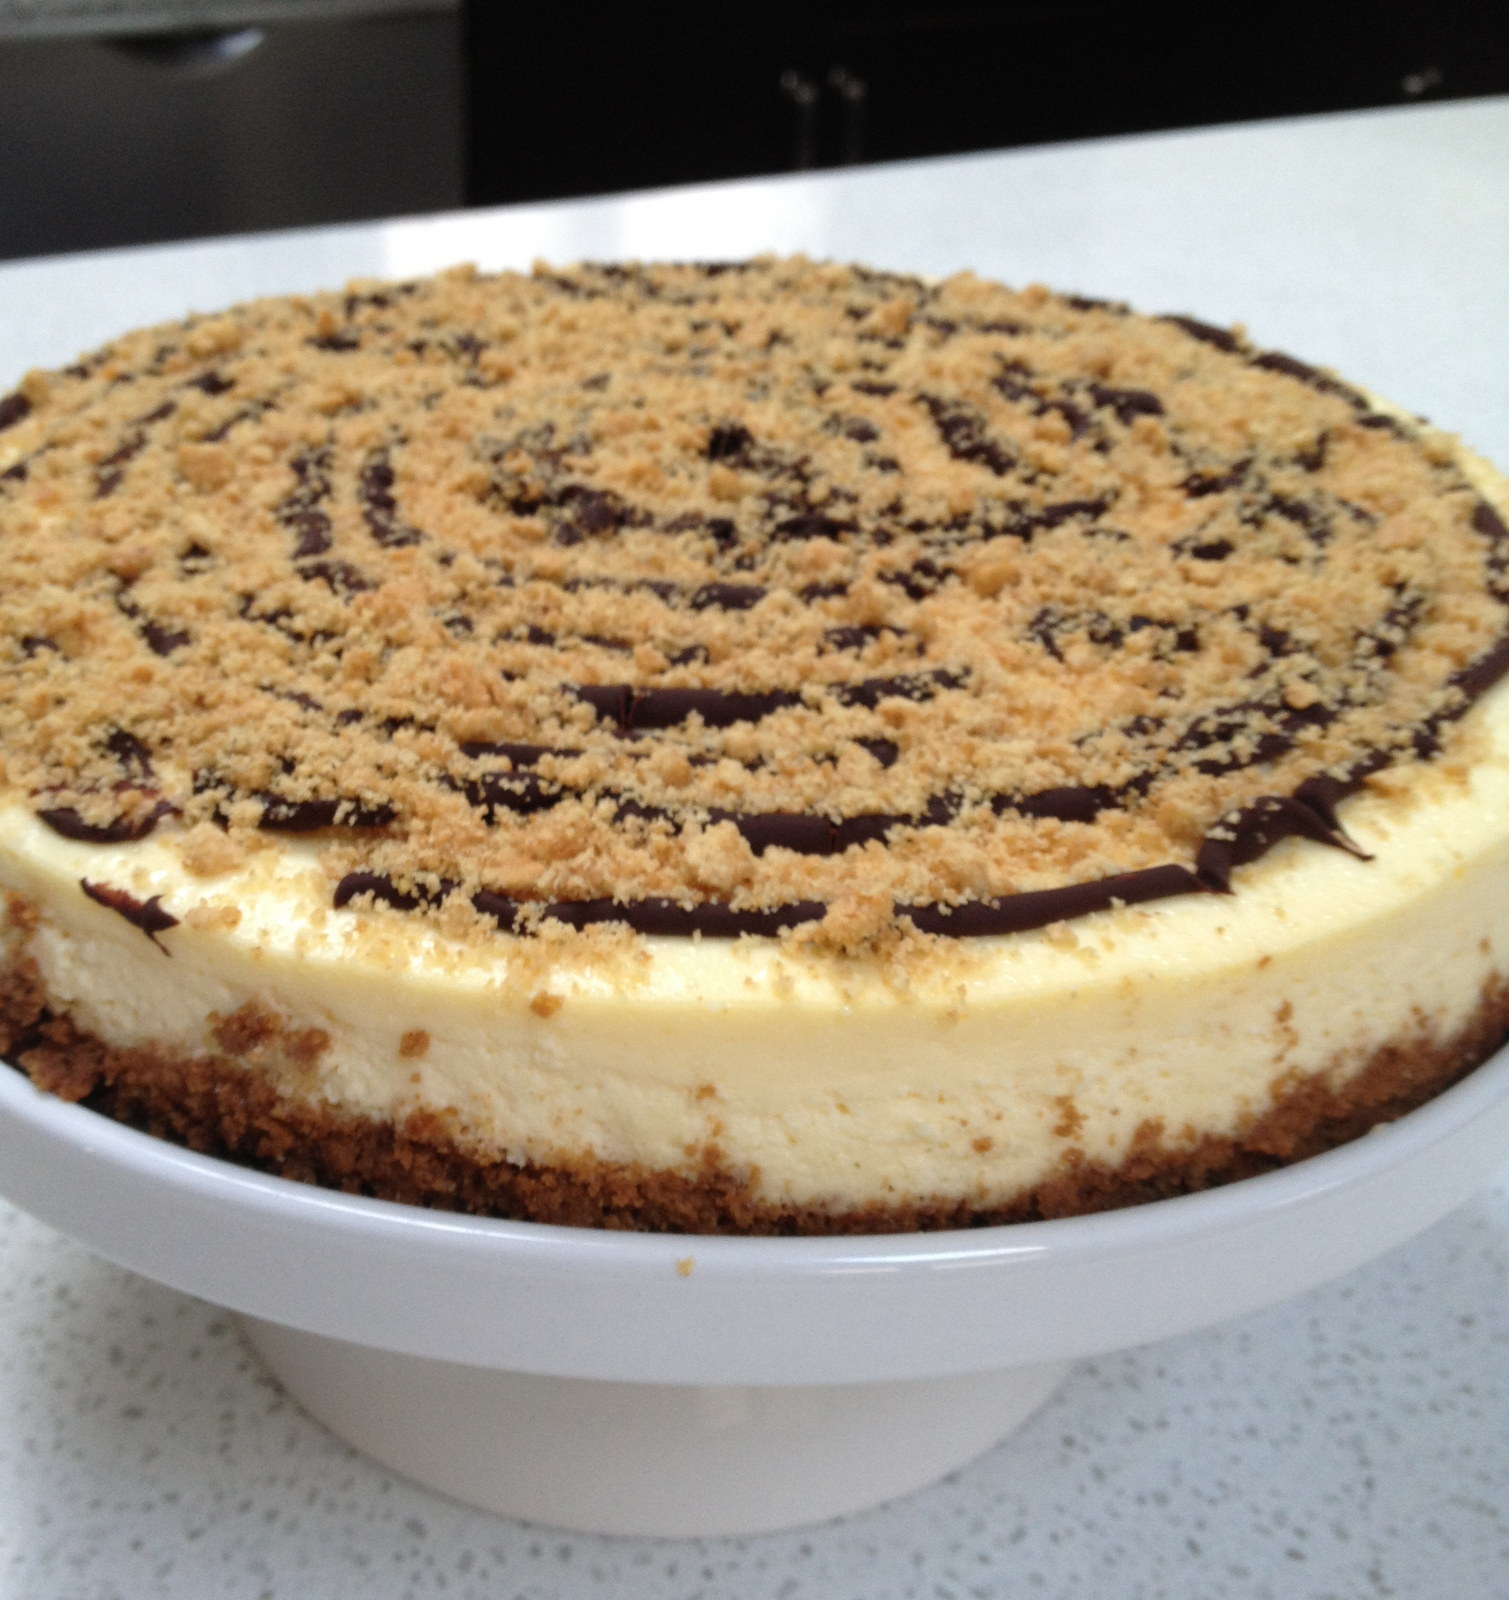
Cheesecake Chronicles

It's pretty hard to make cheesecake taste bad. With ingredients like cream cheese, sugar, graham crackers, some question the baking part, grab a spoon and shoot for the bowl instead.

But more often than not, we find ourselves eating mediocre cheesecake. The reason for its mediocrity is most often the texture of the cake. Too dry, and you find yourself nudging bits of cake from the roof of your mouth; too soft, you feel like you're eating cream cheese pudding. 
Cheesecake, if done right, should be a very balanced dessert in every sense of the word. Tangy, sweet, smooth with a slight resistance from its graham cracker crust - it should be a culmination of contrasts that just work well together. 

Now if the cheesecake recipe below could afford to be any more decadent than it already is, it would have to be escorted out of the room. So I decided substitute half of the cream cheese for neufchatel cheese. Neufchatel has about 1/3 less fat than regular cream cheese, and honestly, after a series of taste tests I really couldn't detect a significant difference. So why not?! Plus, it has a higher moisture content than cream cheese which makes the texture of this cake nothing less than awesome.

Beyond Ultimate Cheesecake
(yield: 10-12 servings)


4 tbsp butter, melted
2 cups graham cracker crumbs (14 crackers)
2, 8 oz pkg cream cheese, room temperature
2, 8 oz pkg neufchatel cheese, room temperature
1 1/4 cups sugar
4 eggs
1 cup sour cream
1 tbsp almond liquor
1 oz bittersweet chocolate, roughly chopped

Grease a 9" spring-form pan with 1 tbsp of butter. Combine remaining 3 tbsp of butter with graham cracker crumbs. Reserve 3 tbsp of graham cracker mixture for topping, and press remaining portion into pan. Bake at 325°F for 10-12 minutes. Let cool to room temperature.

Combine cream cheese and neufchatel cheese with sugar. Using an electric mixer fitted with a paddle attachment, beat until completely softened. Add eggs, one at a time, and continue to mix. Add sour cream and almond liquor. Mix until completely smooth. Pour mixture into the cooled graham cracker crust.

Reduce oven temperature to 325°F.
Wrap pan with two or three layers of aluminum foil to completely cover any cracks. Place into a large roasting pan and fill with boiling water to reach halfway up the sides of the spring form pan. Bake 1 hour and 15 minutes. Turn oven off and let cake cool inside for another hour.

 Place chocolate into a microwave-safe bowl. Microwave for about 1 minute, mixing every 15 seconds, until chocolate is melted. Using a spoon, drizzle the melted chocolate over the top of the cheesecake, and sprinkle with reserved graham cracker crumbs. Refrigerate for at least 4 hours.

Tuesday, March 6, 2012

Treat Yourself...Right


In search of an indulging treat that you don't have to feel guilty about eating, or giving the kiddies?

Chew on this - a healthy, rich, coconutty, chocolatey cookie made with my new favorite ingredient to cook with - coconut oil.

This oil is INSANELY good for you (among its areas of specialty, skin and hair enhancement, immune health and disease prevention, weight control, yadi yadi yada). And with its butter-like texture, who knew saying "SEE YA!" to our fattening foe would be so easy?


I love things that are good and good for you...feels like I won something :)


Guilt-free Chocolate Coconut Cookies 
(yield: 1 dozen cookies)

1/4 cup unrefined extra-virgin coconut oil
3/4 cup dark brown sugar
1 egg
3/4 cup whole wheat flour
1/4 cup dutch-processed cocoa powder
1/4 tsp salt
1/2 tsp baking soda
1/4 cup bittersweet chocolate, chopped
Non-stick cooking spray

Preheat oven to 350 degrees Fahrenheit. Spray a large cookie sheet with non-stick cooking spray.

Cream together coconut oil and brown sugar (use an electric mixer if you've got one). Stir in the egg, and mix until smooth. In a separate bowl combine flour, cocoa powder, salt, and baking soda. Add dry mixture to the egg mixture in three increments, mixing just until combined. Stir in the chopped chocolate.

Scoop heaping tablespoonfuls of the batter and roll  into balls. Place on cookie sheet, making sure to leave enough room between each cookie. Bake 10-12 minutes. Transfer to a wire rack or plate and let cool.


Thursday, December 15, 2011

Naughty & Nice

When it comes to dessert, some people prefer to be bad, while others genuinly try to find that paradise where flavor and health are able to co-exist harmoniously.

My personal preference is subject to change. That's why I present you with two sweet treats below, that despite sharing the criteria of being yummy, are polar opposites of each other.

First stop: the "nice" option - with ingredients like whole wheat flour, vegetable oil (not butter), egg whites, and a tart burst of fresh cranberries and apples, these delicious bars will satisfy your sweet tooth, and keep you on that right track ;)

Cranberry Apple Bars
(yield: 12 bars)

1 egg
1/4 cup milk
1/4 cup orange juice
1/3 cup vegetable oil (plus more for greasing the pan)
1 cup whole wheat flour
3/4 cup sugar
1 tsp baking soda
1/4 tsp ground cinnamon
pinch of salt
1 large grannysmith apple, peeled and cut into medium cubes
1 cup fresh cranberries
1 egg white
1 tsp lemon juice
2 tsp sugar

Preheat oven to 350 degrees Fahrenheit. Grease a 9"x13" baking pan with oil.

Using an electric mixer, beat the egg, milk, orange juice, and oil together in a large bowl. In a separate bowl, combine the whole wheat flour, sugar, baking soda, cinnamon, and salt. Gradually add the dry mixture to the wet mixture, mixing just to combine. Stir in the cranberries and apples. Pour batter into prepared pan, and spread evenly.

Make the merengue: In a clean bowl, whip the egg white until frothy. Add lemon juice and sugar, and continue to whip until soft peaks form. Dollop the merengue all over the batter. Using a spoon, gently spread the dollops across the batter.

Bake about 25-27 minutes, until the merengue becomes slightly golden. Let cool completely in pan before cutting.


Now for all you hooligans out there, who are looking to get down to business, here it is...
wait for it....
Oeey, Gooeey, Chewy, Chocolaty, Rich - this baby doesn't mess around - it's the ULTIMATE BROWNIE!!!!!!!!

Everyone needs a good brownie recipe. If you're serious about chocolate, let this one be yours.

The Ultimate Brownie
(yield: 12 brownies)

1 stick unsalted butter (plus 1 tbsp for greasing)
2 whole eggs
1 egg white
1 1/2 cups sugar
6 1/2 oz semi-sweet chocolate
2 oz unsweetened chocolate
1/4 cup whole milk
3/4 cup All-Purpose flour
1/4 cup Dutch Processes cocoa powder
pinch of salt

Preheat oven to 350 degrees Fahrenheit. Grease a 9"x13" baking pan with butter, and line with parchment paper. Grease the parchment as well.

Using an electric mixer, beat the eggs, egg white, and sugar in a large bowl, until pale yellow, 2-3 minutes. Add the milk.
Place butter, and chocolate into a double boiler, and melt, stirring occasionally. Remove from heat, and let cool 5 minutes. Continue to beat the egg mixture on medium speed as you slowly drizzle in the melted chocolate.

Combine remaining ingredients in a separate bowl. Whisk to combine thoroughly. Add dry mixture to the wet mixture in 3 increments, mixing just until combined. Pour brownie batter into prepared pan, and bake 28-30 minutes, until an inserted toothpick comes out clean. Let cool completely before attempting to dissect the brownies (these guys are pretty gooey). If you're in a hurry, you can pop them in the freezer for a few minutes before cutting.

Monday, November 14, 2011

Chai Tea Ice Cream

Whoever said ice cream is meant to be eaten in the summer should be put in a corner.

Why must we be so literal, people? Why can't we warm up in unconventional ways? On a brisk fall day, you may want to warm your soul with a pinch of cinnamon, a tingle of spicy ginger and peppercorn, and a waft of fragrant vanilla. So, why not put all that into a cool mouthful of ice cream? You'll get it when you try it, trust me...


Chai Tea Ice Cream

(yield: 1 pint)

2 cups whole milk
1/2 of a vanilla bean, scraped
1 cinnamon stick
2, 1-inch slices fresh ginger
1/4 tsp whole black peppercorns
pinch of salt
3 bags of black tea (Earl Grey or Lipton will do)
1/2 cup sugar
5 egg yolks

Place milk, vanilla seeds (and scraped bean), cinnamon stick, ginger, peppercorns, salt, tea bags, and 1/4 cup sugar into a medium saucepan over low heat. Bring to a faint simmer, and remove from heat. Discard the tea bags.

In a medium bowl, whisk the yolks with the remaining 1/4 cup sugar. Continue to whisk as you gradually pour the hot milk into the bowl. Return the mixture to the saucepan. Cook, stirring constantly, over very low heat for 3-4 minutes, until the custard thickens slightly and coats the back of a wooden spoon. Discard spices, and strain the mixture into a bowl or container. Let custard cool to room temerature, and then continue to chill in the refrigerator for at least 1 hour.

Pour the custard into an ice cream machine, and churn according to manufacturer's instructions (my cuisinart ice cream machine took 30 minutes). Transfer churned ice cream to a freezer-safe container and chill in the freezer until ready to eat. If you can't wait that long, you will have to settle for soft-serve ice cream, Boo hoo!

Thursday, October 13, 2011

Leftover Makeover

Somehow, don't ask me how, I got stuck with the 20 lbs of cake that were left over from  my brother-in-law's wedding. After being carelessly dissected and wrapped in aluminum foil, the cake (and all its parts) was thrown into my freezer. I guess I hadn't visited my freezer in a while, because yesterday on the 3 week anniversary of the wedding, I discovered the forgotten cake.

I have to admit, when the urge for something sweet beckons, there are no limits. I've been known to pick at things completely covered in freezer burn, that probably should have already been disposed of. But this cake, though it wasn't exactly past its expiration, just didn't stimulate me in the least bit. It was a bland white sponge, with a bland white buttercream that tasted like a greasy concoction of crisco and sugar. I had to either throw it out, or turn it into something else, enitrely. Being the cheapskate that I am, I was soon left with only one option. But what to do? A trifle of some sort? Nah, too easy. And then it came to me - rum balls!

When in culinary doubt, turn to the liquor cabinet for advice. But don't quote me on that one.

Rum Balls
(yield: about 20 balls)


6 cups leftover cake (sponge with some sort of cream filling will do), crumbled or grated, if frozen
1/4 cup dark rum
1 tbsp light corn syrup
1/2 cup sprinkles (you can use coconut flakes, grated chocolate, or chopped nuts in addition to, or instead of, the sprinkles)


Combine the crumbled cake, rum, and corn syrup in a large bowl. Work the mixture together with your hands to form a dense, moist dough. If it seems too dry, add a little more rum. Roll the mixture into balls slightly smaller than a golf ball, and then roll into sprinkles or other desired toppings. Indulge immediately, or refrigerate until ready to serve.


Friday, September 16, 2011

Cut It Out!

While sprinkling pieces of chocolate into my yogurt this morning, I realized that it was time for an intervention.

Though my daily diet is quite healthy, sugar is the one thing that I have never really been able to control. It's not so much an inability to control my sugar consumption that I've been suffering from, but an inability to acknowledge it as a problem. Sugar makes me happy. Aren't things that make you happy generally good for you? Okay, I take that back. Sometimes things that are blatantly wrong sound right in your head until you verbalize them.

So intervention it is, huh? Do it with me...I think I've actually found a way to make it relatively painless. I'm starting with cookies ;)

I know what you're thinking, but my strategy entails pursuing a goal in moderation. Sugar has snuck its way into the cookie recipe below, but it comes in the form of natural sugar. Yes, honey, orange juice, and even peanut butter do contain sugar, but these ingredients also contain vitamins and minerals that table sugar, or sucrose simply does not. Also, since honey is inherently sweeter than sucrose, we don't have to use as much.

The lesson at hand - sometimes you can feel good about eating cookies, as long as they are the sum of their healthy parts (and as long as they taste good of course).

Peanut Butter & Jelly Thumbprints
(yield: 16 cookies)

3 tbsp margerine, melted
1/4 cup orange juice
1/4 cup honey
1/4 cup chunky peanut butter
1 cup All-Purpose flour
1 cup oats (quick-cooking)
1/4 tsp baking powder
pinch of salt
2 tbsp sugar-free strawberry jelly


Preheat oven to 350 degrees Fahrenheit. Line a large sheetpan with parchment paper.

In a large bowl, combine first 4 ingredients, until a smooth mixture forms.

Mix together flour, oats, baking powder, and salt in a separate bowl. Add the dry mixture into the wet mixture in 3 increments, mixing just until combined. Roll heaping tablespoonfuls of the dough into balls, and place onto prepared pan, spacing the cookies about 2 inches apart.

Using the back of a wooden spoon, make holes in the center of each cookie, making sure not to pierce through the bottom. Fill each hole with 1/4 tsp of jelly, reserving whatever remains of the jelly for later. Bake 14-16 minutes. Once cool, spoon a little more jelly into the hole of each cookie.

Tuesday, September 6, 2011

One Last Horrah

I'm having a very difficult time watching summer slip away. The hardest part about the whole thing is probably parting with all the refreshingly light and colorful treats the season has to offer.

I know it's time to move on, but what's the hurt in celebrating the end of a wonderful season with one last spoonful of something that throws you right back onto that beach, backyard, or rooftop and fills your nostrils with aromas of char-grilled barbecue, pies, and ice-cold watermelon? But my way of celebrating entails a little bit of rum...

Summer's not over until I say it's over, you hear?! Okay, I guess now that I've had some Mojito Sorbet, it's over.


Mojito Sorbet   
                                                                                  

1 cup fresh lime juice (5-6 limes)
2 cups water
1 cup sugar
1 cup fresh mint
zest of 2 limes
1/2 cup rum


(yield: about 1 quart)

Stir water and sugar together in a saucepan over medium heat. Bring to a simmer, and stir until sugar is completely dissolved. Add mint and lime zest, remove saucepan from heat, and let steep 1 hour.

Once the mixture comes to room temperature, cool in the refrigerator for at least 1 hour. Remove mint leaves, and stir in the rum. Pour mixture into ice cream machine, and freeze according to manufacturer's instructions. (My cuisinart took about 30 minutes). Transfer to a freezer-safe container, and freeze until ready to eat.

Who says you can't do mojitos via spoon?

Wednesday, August 17, 2011

The Decadent Hour

It's 9 pm. I just put the baby to bed. Instead of unwinding from the day's events by plopping onto my couch and watching reruns of The Real Housewives of Jersey, I can't stop thinking about the two bananas going bad in my fridge. So I grab them, and re-purpose them the best way I know how - with chocolate. Wouldn't it be grand if we could camouflage everything gone bad in life with chocolate? Bad news, we can't.
Very good news, I made Peanut Butter & Banana Brownies!

PB & B Brownies


(yield: 12 brownies)
 

10 oz semi-sweet chocolate chips
3 tbsp unsalted butter, plus more for greasing
1/2 cup peanut butter, chunky
1 cup sugar
2 ripe bananas, mashed
3 eggs
1 cup flour
2 tbsp dutch-processed cocoa powder
pinch of salt
1/4 cup roasted peanuts, chopped

Preheat oven to 350 degrees Fahrenheit. Grease a rectangular 13" x 9" pan with butter. Line with parchment paper, and grease parchment with butter as well.

In a double boiler set over low heat, melt 8 oz of the chocolate chips along with butter and peanut butter. Once mixture is melted, remove from heat, and mix in the sugar. Continue to whisk constantly while adding the bananas, followed by the eggs.

In a separate bowl, combine flour, cocoa powder, salt, and the remaining 2 oz of chocolate chips. Whisk well to remove any lumps. Gradually add flour mixture into chocolate mixture, whisking just until combined. Pour batter into prepared pan, and smooth top with a spatula. Sprinkle with chopped nuts. Bake 20-22 minutes. Let brownies cool in pan for at least 10 minutes, before cutting.


Tuesday, July 5, 2011

Poor Man's Pick-Me-Up


One of my all-time favorite desserts to make when entertaining is Tiramisu. It's an impressive crowd pleaser that requires no baking, and it has booze in it; what more can you ask for? Although a traditional tiramisu generally requires only a handful of ingredients, some of these ingredients can really hike up your budget, and have you wondering if you should have gone to the bakery instead.

I have an awesome Tiramisu recipe that I've been relying on for years. So I figured if I use the same method, but either replace or eliminate some of the expensive candidates, we'd be in business. It was a risk, but whisk in hand, it was one I was ready to take. Probably the most expensive of these ingredients is Mascarpone Cheese, an Italian and more delicate version of cream cheese. Contemplating its replacement, I decided to go a little loco and eliminate the Mascarpone all together.

As for the booze portion of this dessert, which can also run you a good buck, I say when a recipe calls for a liquor, use what you got. Coffee liquor, rum, or even amaretto are the usual suspects for this particular dessert. But you know what, I didn't have any of those in my liquor cabinet. Not eager to shell out 20+ bucks for something that I would only use a few tablespoons of, I improvised and used coffee flavored tequila instead.

Even if all you have is some strongly flavored liquor like raspberry, coconut, or almond, go for it! Yeah it won't be a conventional tiramisu, but it will be your signature tiramisu. After all, rules are for people too scared to make their own.

Poor Man's Tiramisu
(yield: 12-14 servings)

5 eggs, separated
1 cup sugar
1/4 cup cocoa powder
2 tbsp instant coffee (or espresso)
1 pint heavy cream
4 tbsp coffee-flavored liquor (or whatever you have on hand)
24 ladyfinger cookies (or any elongated cookies, whatever is cheaper)

Whisk together egg yolks, 1/4 cup sugar, and 1 tbsp cocoa powder in a large bowl. Place over water bath* and continue to whisk over low heat, until mixture thickens and increases in volume, about 8 minutes. Using an electric mixer, beat the egg whites with 1/4 cup sugar to form stiff peaks; set aside.

Dissolve 1 tbsp of instant coffee in 2 tbsp of boiling water (this will be used to flavor the whipped cream). Set aside, and let cool. 

Dissolve the remaining 3 tbsp of instant coffee in 2 cups boiling water. Stir in coffee liquor, and set aside to cool (this will be used to soak the ladyfingers).

Using an electric mixer, beat the heavy cream with 1/2 cup sugar and the reserved coffee (the first mixture - 1 tbsp) to form stiff peaks.

Fold the beaten egg whites into the egg yolk mixture in increments of 4. Now gently fold the whipped cream into the egg mixture in the same manner.

Spoon some of the cream into a trifle dish so that it reaches about 1-inch up the sides. Soak the ladyfingers in the reserved coffee mixture (the 2nd mixture with the liquor) for a few seconds, and arrange them to cover the surface of the cream (6 ladyfingers should do the trick if using a standard trifle dish). Top with another layer of cream, slightly thicker than the first. Continue with ladyfingers, another layer of cream, and repeat twice more, ending with a layer of cream.
Use a sieve or strainer to dust the remaining cocoa powder over the top.

If you're feeling extra fancy, place a spoon and fork in a cross pattern on top of the finished tiramisu before dusting with cocoa powder. After dusting, gently remove the utensils and you should have a beautiful little embellishment (not that this dessert really needs it). Refrigerate overnight, or at least 6 hours.

*To form a water bath, fill a medium saucepan 1/4 of the way up with water. Bring to a simmer, and reduce heat to low. Top with a bowl that is large enough to sit on top without falling through or touching the water.

Wednesday, June 22, 2011

Dippity Do Da


Some things are meant for dipping; oreos, bread, your finger on occasion. But the most "dippable" of all culinary creations has got to be the biscotti. A twice baked cookie that was perhaps designed for the purpose of dipping into espresso or  a perfectly cold glass of milk, in my opinion, the biscotti is a sophisticated cookie. Don't ask me why. I feel sophisticated when I eat it, okay?!

Triple Chocolate Biscotti
(yield: about 30 cookies)

 2 3/4 cups all-purpose flour
1/2 cup cocoa powder (unsweetened)
1 tbsp baking powder
1/2 tsp salt
3 eggs
1 cup sugar
1/2 cup vegetable or canola oil
10 oz semi-sweet chocolate chips

Line a large rectangular sheet-pan with parchment paper.
In a large bowl, combine first 4 ingredient. Stir well to combine. In a separate medium bowl, whisk together next three ingredients. Add the wet ingredients to the dry, and mix just until a dough forms. Mix in 1/3 of the chocolate chips. Refrigerate for 40 minutes.

Divide the dough in half and place onto prepared pan, forming two rectangular logs the length of the sheet-pan. Flatten the logs slightly so that they are about 1-2 inches high. Bake in a preheated 375 degree oven for 30 minutes.

Remove from oven, and let cool slightly. Using a serrated knife, slice the logs horizontally into 1/2-inch slices. Lay the slices flat onto the sheet-pan, and bake for an additional 10 minutes, flipping them over after 5 minutes. Cool completely.

While the biscotti cool, melt the chocolate: Place remaining chocolate chips into a microwave-safe bowl, and microwave for a minute, stopping to mix every 15 seconds, until chocolate is completely melted. Dip 1-2 inches of each biscotti into the melted chocolate, and place back on parchment-lined sheet-pan. Refrigerate until chocolate is set.

Thursday, May 19, 2011

Me So Corny!


I know I posted a muffin recipe last week, but I just couldn't help but share this one. It's so easy, so good, and so addictive!

Inevitably, muffin madness continues...


Addictive Corn Muffins
(yield: 10 muffins)

1/2 cup milk
1/2 cup (4 tbsp) unsalted butter, melted
1 egg
3/4 cup flour
3/4 cup yellow corn meal
1 cup sugar
1/2 tsp baking powder
1/2 tsp salt


Preheat oven to 375 degrees Fahrenheit. Line 1 or 2 muffin pans with 10 muffin liners.

Whisk together milk, butter, and egg in a medium bowl.  In a large bowl, combine remaining ingredients.

Add wet ingredients to dry, and mix just until combined. Distribute batter among muffin pan, and bake 22-24 minutes until tops are lightly golden brown.


Sunday, May 1, 2011

A Cookie for the Bride


One thing I remember about my wedding day is an empty stomach.

From the photographer snapping away to the guests ambushing me with congratulatory speeches, I barely had the chance to eat that day, let alone go to the bathroom (but that's a whole nother story).

So a few weeks ago when I was a bridesmaid in my friend's wedding, I decided to intervene by making cookies. Unfortunately my efforts proved futile since the bride was way too nervous to eat, and the groom turned out to be allergic to chocolate.

In any case, the rest of the bridal party seemed to enjoy them :)

Mocha Cookies
yield: about a dozen cookies

1 stick butter, unsalted
1 cup + 2 tbsp sugar
1 egg
1 tsp espresso powder (or instant coffee) dissolved in 1 tbsp hot water
1 tsp vanilla extract
1 cup flour
1/4 cup + 2 tsp cocoa powder, unsweetened
1 tsp baking soda
1 tsp baking powder
1/8 tsp ground cinnamon
1/8 tsp salt

In a large bowl, cream together butter and 1 cup sugar, until pale yellow and creamy (Use an electric mixer fitted with a paddle attachment if you have one). Continue to mix, as you add the egg, espresso mixture, and the vanilla extract.

In a separate bowl, conbine the flour, 1/4 cup cocoa powder, baking soda, baking powder, cinnamon, and salt. Add flour mixture to the butter mixture, and mix until combined. Chill cookie batter in the refrigerator for 20 minutes.

In a small bowl, combine the remaining 2 tsp cocoa powder with 2 tbsp sugar, and set aside.

Preheat oven to 375 degrees Fahrenheit. Line 2 rectangular sheetpans with parchment paper.

Roll the chilled cookie batter into balls (slightly smaller than the size of a golf ball), dip into the cocoa-sugar mixture, and place on the sheetpan (making sure to provide adequate space between each cookie).
Bake about 12 minutes.

Tuesday, April 26, 2011

Seder Success

I tackled my first seder dinner yesterday, and I'm happy to report that I'm still alive.

Yes, I did kind of stray from the original menu that I posted last week, but the food was great and most importantly, the fam was fed. Though my family was ravenous, and would have probably been content eating cardboard by the time we got through all the rituals and explanations of Passover, they did seem to enjoy the food very much.

So, with no further adeau, I'm really proud to present to you Mama Chef's final Passover Seder Menu...


- Matzo Ball Soup
- Baby Spinach Salad with Roasted Beets, Oranges, Walnuts,  
   & Red Wine Vinaigrette
- Garlic & Walnut Eggplant
- Crispy Flounder Cakes with Avocado Horseradish Cream
- Braised Chicken with Dried Apricots & Moroccan Spices               - Apple Matzo Upside-down Cakes

Matzo Ball Soup
(yield: approximately 10 servings) 

carcass of a medium (6 lb) chicken, insides & meat removed
 3 ¾ quarts (15 cups) cold water
1 large yellow onion, peeled & cut in half (keeping root end intact)
3 medium carrots, each peeled & cut into 2-inch pieces
2 medium stalks celery, each cut into 2-inch pieces
3 ounces celery root, peeled and halved
1 ½ oz parsley stems
2 bay leaves
5 black peppercorns
salt, to taste
1 pkg matzah ball mix
3 tbsp dill (optional)


Prepare the chicken: Remove the innards and skin from the entire chicken, and rinse it inside and out under cold running water. Remove the meat (thighs, drumsticks, breast, and wings) from the chicken, and reserve for Braised Chicken with Dried Apricots & Moroccan Spices (or any other chicken dish you may want to make). 
Place the chicken carcass into a large stockpot. Cover with cold water. Place the onion, carrots, celery, and celery root into the pot.

Wrap the parsley stems, bay leaves and peppercorns in a piece of cheesecloth. Secure the cheesecloth tightly with kitchen twine, and add to the pot. Bring to a boil, and skim off any foam that floats to the top. Season with salt. Reduce heat to low and simmer covered for 45 minutes, skimming every 15 minutes. Strain the bouillon, reserving the carrots and celery. Discard the onion pieces, celery root and cheese cloth. Adjust seasoning with more salt if necessary.

While the soup simmers, you can make the matzo balls. Just follow the package instructions, carefully.

Okay, you want to hear my opinion on using packaged matzo ball mixes? I say, why the heck not. Granted, you choose the right brand of course. I've tried my fair share of mixes, and they are not all created equal. Streits is currently my favorite brand, because their matzo balls come out light and fluffy, and don't take away from the flavor of your delicious broth, which you must prepare from scratch. 

Assemble the soup: Ladle the broth into bowls, along with carrots, celery, and matzo balls (about 3 balls per serving is appropriate in my opinion). Garnish with dill.


Spinach Salad with Roasted Beets, Oranges, & Walnuts
(yield: 4-5 servings)


2 tsp red wine (or grape juice)
1 tsp orange juice
1 tsp red wine vinegar
1 1/2 oz olive oil
salt & pepper,
to taste
3-4 small red beets
4 cups Baby Spinach
1 medium orange,
cut into segments (reserve the unused portions for the vinaigrette)
1/2 cup walnuts,
toasted


 Preheat oven to 400 degrees Fahrenheit. Rinse and dry the beets (making sure to cut off the beet greens). Place onto a large piece of aluminum foil, drizzle with olive oil or vegetable oil, and fold the foil over the beets, sealing to form a pouch. Roast for up to an hour, checking for doneness with a knife after 45 minutes. The knife should ease right through the beets when they are done. Once done, let the beets cool slightly. Using a paper towl or kitchen towel, rub the skins off (they should come off easily). Dice into 1/2-inch rounds or half moons (depending on the size of the beets), and set aside.

Make the vinaigrette: Whisk together the red wine, orange juice, and red wine vinegar in a small bowl. Continue to whisk as you drizzle in the olive oil. Season with salt and pepper.

Toss the baby spinach with prepared vinaigrette (reserving 2 tbsp of the vinaigrette) and place onto a large serving platter. Arrange the roasted beets, orange segments, and walnuts over the greens, and drizzle with remaining 2 tbsp of vinaigrette.


Garlic & Walnut Eggplant
(yield: 4 servings)

1 medium eggplant, sliced into 1/4-inch rounds
kosher salt, as needed
olive oil, as needed
1/3 cup walnut oil
2 cloves garlic, crushed
1 tbsp finely chopped parsley
1/2 cup walnuts, toasted & finely chopped
salt & pepper, as needed

Arrange the eggplant slices on a large plate or baking pan, and sprinkle generously with kosher salt. Let sit 20 minutes. Rinse eggplant, and pat dry.
Coat the bottom of a large saute pan with olive oil and heat over a medium flame. Once the oil is hot, add the eggplant slices, and fry until tender and golden, about 4-5 minutes per side. You may have to work in batches, so as not to overcrowd the pan. Remove eggplant from the pan, and arrange in overlapping layers on a plate.

Drain away excess oil in the pan, and wipe the surface with a paper towel. Pour walnut oil into the pan and warm over low heat. Add garlic and parsley. Cook, stirring, for 2-3 minutes. Pour warm oil over eggplant, and sprinkle with walnuts. You can definitely eat this dish immediately, but it is best to let it sit for at least an hour.


Crispy Flounder Cakes with Avocado Horseradish Cream
(yield: 8-10 cakes)

water, as needed
1 lemon, sliced
2 bay leafs
1 tsp whole peppercorns
2 lbs filet of flounder
2 eggs
1 1/2 tbsp dijon mustard
1 scallion, finely chopped
1 clove garlic, finely chopped
parsley, finely chopped
1 tsp oregano
2 tsp salt
1/2 tsp pepper
1 cup matzo meal
vegetable oil, as needed

Avocado Horseradish Cream
1 avocado
1 1/2 tbsp prepared horseradish
juice of 1 lemon                           1 1/2 tsp salt

Poach the fish: Fill a saute pan 1/4 of the way up with water. Add lemon slices, bay leaf, and peppercorns and bring to a simmer. Add flounder filets to the pan in a single layer (if it gets too crowded, use a second pan). Simmer gently until fish is cooked through and opaque, about 20 minutes. Remove from poaching liquid and let cool.

Flake the cooled fish into a large bowl. Add 1 egg, dijon mustard, scallion, garlic, parley, oregano, salt, pepper, and 1/2 cup of the matzah meal. Gently mix until all ingredients are thoroughly combined. Form mixture into 8-10 patties (depending on how big you want them).

In a wide, shallow bowl, beat the remaining egg with 1 tbsp of water (this is the egg wash). Pour the remaining 1/2 cup of matzah meal into another wide, shallow bowl.

Fill a large non-stick pan with vegetable oil to reach 1/4 of the way up the sides, and place over medium-high heat. Coat the patties in the egg wash, dredge in matzah meal, and fry until golden brown and crisp on both sides, about 5 minutes per side. Serve right away with Avocado Horseradish Cream.

Make the Avocado Horseradish cream: Combine all ingredients for the cream in a food processor, and puree until smooth and creamy.

Braised Chicken with Dried Apricots & Moroccan Spices
(yield: 4-5 servings)


1, 6 lb chicken, insides removed & cut into 10 parts (reserve carcass for matzo ball soup)
vegetable oil, as needed
1 medium yellow onion, sliced
4 cloves garlic
1/2 tsp ground cumin
1/2 tsp ground coriander
1/4 tsp ground turmeric
1 cinnamon stick, broken in half
3 medium carrots
2 stalks celery
4 medium potatoes, large dice
5 sprigs fesh thyme
1/2 cup dry red wine
1/4 cup tomato sauce
1 cup chicken stock (you can use broth from the matzo ball soup)
1/2 cup dried apricots
salt & pepper, to taste

Fabricate the chicken: remove 2 drumsticks, 2 thighs, 2 wings, and two breasts from the body of the chicken. Cut each breast in half. Reserve the carcass of the chicken for the matzo ball soup*.

Heat a large pot over medium-high heat, and coat bottom with vegetable oil. Season chicken with salt and pepper, and brown on both sides.

Lower heat, and add the onions, garlic, cumin, coriander, turmeric and cinnamon stick. Cook, stirring, until onions have softened slightly, about 5 minutes. Add carrots, celery, potatoes, and thyme. Cook 2-3 minutes. Add wine, and cook for another 2-3 minutes. Stir in tomato sauce and chicken stock. Once everything reaches a boil reduce heat to low and simmer, covered, for 1 1/2 hours.


Apple Matzo Upside-down Cakes
(yield: 12 mini cakes)


4 sheets matzo
boiling water,
as needed
4 tbsp butter, plus more for greasing
2 grannysmith apples, peeled and diced
1/2 cup sugar
1/4 cup amaretto or frangelico
3 large eggs
1 tsp vanilla extract
1/3 cup sugar


Preheat oven to 350 degrees Fahrenheit. Grease a 12-portion muffin pan with butter.

Place the matzo into a deep bowl, crumbling it up slightly. Pour enough water over the matzo, to just cover. Set aside for 15 minutes. Once the matzo has absorbed the water and softened, place into a strainer and drain, squeezing some of the water out with your hands.

Meanwhile, melt 2 tbsp of butter in a large pan over medium-low heat. Add the apples and 1/2 cup of sugar, and cook (stirring occasionally), about 10 minutes. Add the amaretto, and cook for another 2-3 minutes, until apples have absorbed most of the liquor. Remove from heat, and set aside to cool.

Combine eggs, vanilla, 1/3 cup sugar, and drained matzah in a large bowl. Mix thoroughly.

Distribute the cooled apples among the muffin pan. Top with matzo batter, filling about 3/4 of the way full. Bake 22-25 minutes, until tops have set and an inserted toothpick comes out clean. Let cool. Run a knife around the edges of each cake, and invert the pan onto a large plate. Some of the apples may get left behind (no biggie!) just help them along with a spoon.

Wednesday, April 20, 2011

Mango Lassi Milkshake

(yield: 2 cups)

1 ripe mango, peeled & diced
1 cup vanilla ice cream
1/4 cup milk
pinch of salt
1/8 tsp ground cardamom
2 tbsp pistachios, chopped


Place everything, except for the pistachios, into a blender. Blend on high speed for about a minute
Pour into glasses, and sprinkle with chopped pistachios.

Friday, April 8, 2011

Simplicity at its best

Sometimes, not all the time, but every so often, things are best when left really simple.

When it comes to desserts, I get a little annoyed with those that consist of a million components and that require a million steps to complete. I'm a firm believer in using simple, beautiful ingredients to yield complex flavors (oftentimes more complex than what you would get from one of those fancy, fru-fru desserts).

For a person who used to "ehhh" at the thought of vanilla or panna cotta, this Vanilla Bean Panna Cotta recipe has certainly converted me into a lover of both.

In case you're not following, Panna Cotta, literally translated to mean "cooked cream," is a custard made from cream, milk, sugar, and gelatin. If done right, this dessert should be smooth and decadent, but definitely not rubbery, which is what happens with so many unfortunate recipes.

Panna Cotta can be infused with whatever flavors you can imagine, but for this recipe I decided to keep it simple and evoke the rich, floral, luxurious notes of a fresh vanilla bean.

Vanilla Bean Panna Cotta
yield: 8 servings

1 cup milk
1, .25 oz packet gelatin (powdered)
3 cups heavy cream
1/2 cup sugar
1 tbsp almond liquor
1 vanilla bean
1/4 cup blueberries, optional


In a medium saucepan combine milk and gelatin, and let stand 5 minutes before turning on heat.

Stir over medium-low heat until gelatin dissolves. Add heavy cream, sugar, and almond liquor. Scrape the seeds from the vanilla bean, and add to the saucepan along with the bean. Continue to stir, until sugar dissolves, 2-3 minutes.

Remove pan from heat, and let cool to room temperature. Distribute mixture evenly among 7-oz ramekins or cups, filling about 3/4 of the way up. Cover with plastic wrap, and refrigerate for at least 6 hours, or overnight. Garnish with blueberries.

That's all folks. Really, that's it!


Friday, February 25, 2011

The Greatest Thing Since Sliced Bread...

When I was little, my mother told me to never throw away bread. I don't remember whether she meant that this was a bad omen, or just didn't want me to be wasteful, but it kind of stuck with me. Today, I continue the practice for my own reasons; sometimes I think about starving children in third world countries, and sometimes I just can't bring myself to throw out something as beautiful and profound as bread.

Yesterday, I made brioche french toast for my cookbook photo shoot, and was left with mounds of brioche scraps. Now I would be perfectly content just snacking on these scraps all week, but something told me to take this rich, buttery, sweet bread to the next level. I made bread pudding - a dessert that, in my opinion, can  be a vestibule for any sort of flavors. My flavors of choice were chocolate and hazelnuts...mmm.

With the help of some milk and eggs, I was able to make this decadent dessert between burping and changing baby Zelli.

Here's what I used:
4 oz semi-sweet chocolate, chopped
1/2 cup roasted hazelnuts, chopped
3 tbsp honey 
2 cups whole milk
3 eggs
3 1/2 cups brioche bread, cut into 1-inch cubes (you can use hallah bread as well) 
butter, as needed (for greasing)

1. Melt the chocolate in a double boiler: Fill a heavy saucepan with 3 inches of water and bring to a simmer over medium heat. Place chopped chocolate into a medium bowl, and rest bowl on top of saucepan. Stir occasionally, until chocolate is melted and smooth. Stir in the chopped hazelnuts and honey. Set aside to cool for a few minutes.

2. In a large bowl, whisk together milk and eggs. Add bread and cooled chocolate mixture. Stir to coat all of the bread cubes. Cover and refrigerate for at least 1 1/2 hours.


3. Preheat oven to 350 degrees Fahrenheit. Butter a rectangular or oval baking pan. Pour soaked bread into pan, making sure to get all of the liquid from the bottom of the bowl.  


Place pan into a large roasting pan, and fill roasting pan with water to reach halfway up the sides of the smaller pan. Bake 30-35 minutes, until top is set, but not too firm. Serve warm or room temperature with whipped cream or ice cream.


Friday, February 11, 2011

Let Them Eat Cake Part II


I’m proud to say that I conquered my cake-making phobia. I finally completed the cake for my friend’s baby shower, and, surprisingly enough, it was not a horrendous disaster. Having put a lot of thought into the cake’s design, I ended up settling on a onsie-shaped cake. Simple enough for an “experienced amateur” like myself, but cute and bold enough to win some smiles, I decided that this design would work best.

 I started by making fondant the night before.  I know the word “fondant” and the process of making it might scare many of you off, but hang in there. It’s really not that difficult.
So, as I mentioned in my previous post, fondant is the smooth cake covering that has gained sort of a bad rep lately. It’s rubbery texture and uber sugary taste causes most people to peel it off of their cake and leave it behind on their plates. I found an alternative, marshmallow-based fondant recipe that, not only tastes better, but is much easier to make than the one commonly used by pastry chefs.

Here’s how I did it…
You will need:
2, 10 oz packages of marshmallows
4 tbsp water
Canola (or vegetable) oil, as needed
Blue food coloring (drops or paste)
4 heaping tbsp cocoa powder
1lb box confectioners’ sugar
1 large microwave-safe bowl
1 medium microwave-safe bowl
Wooden spoon or spatula
Parchment paper or aluminum foil
sifter

*I chose a blue/brown color scheme because my friend is having a boy, but feel free to experiment with whatever colors you want.

  1. Prepare materials: Grease the inside of your bowls and wooden spoon with oil. Place 15 oz of the marshmallows (1 ½ bags) into the large bowl, and the rest of the marshmallows into the medium bowl. Line your work surface with parchment paper, taping it down so that it doesn’t move. 
  2. Work with one bowl at a time: Microwave the large bowl until marshmallows have puffed up, 1 ½ -2 minutes. Add a few drops of the food coloring, and stir with greased spoon. Continue to add food coloring until the marshmallows are a baby blue color (Make it slightly darker than what you want the finished product to look like, because the confectioners’ sugar will lighten the color).
  3. Begin to sift the confectioners sugar into the colored marshmallows: Continue to sift and stir until the mixture is still sticky, but forms a uniform mass. Sprinkle some confectioners’ sugar on your work surface, and transfer mixture from bowl to work surface. Oil your hands and dust with confectioners’ sugar. Begin to knead the mixture by hand, working more sugar in as you go. Try to add as little sugar as it takes to form  a soft dough. It should still be somewhat sticky, but just as you feel that it is manageable enough to form into a ball of dough, stop adding sugar. (In total, you should have used at least half of the box of sugar)
  4. Repeat process with medium bowl, using cocoa powder instead of the food coloring to form a pastel brown color (Add more cocoa powder to adjust color, if necessary). This dough will obviously require less sugar than the blue dough.
  5. Brush each piece of fondant lightly with oil, and wrap tightly in plastic wrap. Store the fondant at room temperature until ready for use. It can be stored at room temperature for up to a month as long as it is tightly wrapped.
Pheww... that wasn’t so bad, was it?

Now the cake…
I decided to make a chocolate cake, cause what pregnant woman (or woman, in general) wouldn’t want chocolate.

You will need:
4 cups All Purpose flour          1 cup vegetable oil                      
   2 cups cocoa powder              4 eggs                                           
4 cups sugar                             4 tsp vanilla extract                    
2 tsp baking soda                    2 cups sour cream                        
2 tsp baking powder               2 cups coffee, room temperature                                        
1 tsp salt                                  
parchment paper
non-stick cooking spray
1/2 sheet pan(18"x13") though a large square pan of similar dimensions is ideal                                  

  1. Preheat oven to 350 degrees Fahrenheit (if your oven has a convection option, use it). Spray sheet pan with non-stick spray, and cover with parchment, spraying parchment as well. If you have more than 1 sheet pan, great. If not, you’ll have to bake in 3 batches.
  2. Using an electric mixer with a whisk attachment, combine all of the dry ingredients (first 6) in a large bowl. You may also work by hand, using a whisk.
  3. In a separate bowl, combine remaining wet ingredients. With the mixer on medium-low speed, add the wet ingredients to the dry, and mix until batter is smooth. Distribute batter evenly among sheet pans, or if working with only one, pour 1/3 of the batter into sheet pan. Bake 15-17 minutes, until inserted toothpick comes out clean. Allow cake to cool in sheet pan before removing. Repeat until you have made 3 cakes.
For the filling:

I decided to fill the cake with a chocolate pastry cream and an almond whipped cream.
Now, I know what you’re thinking. Pastry cream, really? I had those very same thoughts. And even though I’ve made pastry cream in the past (and it’s really not that hard,) I opted for a short cut. That short cut was chocolate pudding. Crazy, right?! Hear me out before you judge me.
A. It’s a great time saver – instant takes 5 minutes.
B. It gives the cake a richer chocolate flavor, and makes it super moist.
As for the whipped cream, that’s easy enough for anyone to do. You whip it; that’s pretty much it.

For the filling, I used:
1 package instant chocolate pudding (which requires 2 cups of milk to prepare)
2 cups heavy whipping cream
4 tbsp sugar
3 tsp almond extract (you can use any extract or flavoring you want)

Combine the heavy cream, sugar and almond extract in a medium bowl. Using a standing mixer, beat the mixture until stiff peaks form. Oh, and if you want to prepare the whipped cream a few hours ahead of time, make sure to chill your bowl and whisk in the freezer for 15 minutes before using. 

And now for the fun part…assembly

Pick a platter on which to assemble your cake. Make sure it’s big enough and not too heavy, because once you start assembling your cake chances are you won’t be able to move it.

  you will need:
  Your baked and cooled cakes
        Prepared chocolate pudding
        Prepared whipped cream
        prepared fondant
        Confectioners sugar
        Offset spatula
        Rolling pin
        Parchment paper
        Pastry brush
        ¼ cup vodka
        Candy buttons (you can get these at a cake supply store)
        3 oz semi-sweet chocolate
        2 oz white chocolate (optional)

  1. Place one cake layer onto platter. Top with half of the chocolate pudding. Using the offset spatula, spread the pudding evenly across entire cake, leaving about ½-inch border on each side. Follow, by spreading 1/3 of the whipped cream on top. Top with second layer of cake. Repeat with a layer of pudding, and a layer of whipped cream. Top with final cake layer, and frost with remaining whipped cream.

  1. Cut the cake into the shape of a onsie. If you happen to have a 6 or 9 month onsie laying around the house, you can use it as your guide. If not, your imagination will work just fine (it’s a pretty straight forward shape). Don’t discard the excess cake pieces just yet; you might need to use them to adjust your cake. Set cake aside.

  1. Cover your work surface with parchment paper, and dust with confectioners’ sugar. Dust your rolling pin with sugar, and begin to roll the blue fondant. Work from the middle outward, turning fondant 180 degrees every now and then. Roll into a large rectangle that is a little over than a ¼-inch thick (don’t make it too thin, as it may tear). Transfer rolled fondant from work surface to cake by rolling onto rolling pin and then unrolling over the cake. Cover all but the sleeves of the cake with the blue fondant. Gently smooth the fondant over and around the cake, and trim off excess, leaving an extra inch at the bottom just in case. Tuck the ends under the cake.

  1. Roll out the brown fondant. Cut 2 large pieces to cover the sleeves of the cake, a 5”x4” rectangle to go in the center of the onsie, and reserve a few small pieces of fondant for details. Cover the sleeves with the fondant as you did the rest of the cake. Attach fondant rectangle to cake by brushing some vodka on the back. Use the vodka to attach a button at each corner of the rectangle. Cut three strips out of the reserved piece of fondant, and use for details on onsie. Use vodka to attach pieces to the cake as well.

  1. Place the semi-sweet chocolate in a microwave-safe container and microwave for about 45 seconds, stirring every 15 seconds until it is completely smooth. Transfer melted chocolate to a ziplock bag, and snip a small piece off one edge of the bag. Use the chocolate to write a message on the cake (in the brown rectangle).
*If you want to add some extra details to the cake, like a collar, you can melt white chocolate.